How to Build Your Own Computer Desk [Simple Instructions]
Occasionally I’ll use this blog to present some of the do-it-yourself projects I’ve done around my house. This was originally a three-part series and I’ve since combined them into one post.
Part 1 – Motivation and the Right Computer Desk Plans
My wife and I have been needing a home office computer desk for a while now. We currently have the computer on the floor, with the monitor right on top of it. I use one of my old drums to place the mouse upon. It’s very sad.
We’re saving for a down payment on a town home, so we don’t want to go out and spend a ton on a new desk, that we’ll have to move in a few months anyway. So, I’m attempting to build a nice desk on my own. This will help us save a bit, plus it will provide for a nice hobby over the next couple of months, now that all the sport seasons are virtually over for my town.
I found the plans on PopularMechanics.com. So far I have the top pieces purchased and I’ll finish the cuts this weekend. Next week I will begin working on the bottom. I will try and get a picture up of the finished product.
Part 2 – Buying a Biscuit Joiner and Making Progress
I’ve been building a desk for our home office. I thought it might be more economical to make one instead of buying. Plus, it would serve as a nice night and weekend project for me.
It’s been a while since I’ve made enough progress to post again about this project. The delay was due to two things: us being out of town for three weeks, and me needing a “biscuit joiner” to make the cabinets. Yes, I said biscuit joiner. I didn’t know what one was either at first.
Well, the plans called for biscuit joints to be used on the cabinets, so, I needed the joiner. These “biscuits” basically act like dowels between the pieces of plywood, no screws needed. I guess this is true woodworking.
The joiner was hard to find for a decent price. I went to pawn shops, looked online, looked on sales racks. I ended up getting one (Craftsman) at Sears for around $89. I know you can probably get a less expensive version on Amazon though. Besides the wood (all birch plywood), the joiner has been the biggest investment I’ve had to make in this project.
On to the pics. I’ve finished the top of the desk and the cabinets. Here’s the desk top:

I thought it turned out nice. I’ve got it on top of my folding table until I finish the rest of the desk and can stain (or paint) all at once. You can see the big sheet of birch on top, and support pieces underneath. Also, both the top and supports are surrounded by molding. I’ve had to get very familiar with my miter box.
Here are the completed cabinets. These will support the desk and house the file drawers:

These two cabinets are joined together with nothing but wood glue and wooden #20 biscuits. It feels really good to have made these.
So far I’ve spent around $350 and 25-30 hours on this project. Some of the things I’ve done that have kept me from spending too much:
- Asked Lowe’s to make my rough cuts. The will do this for free with the purchase of wood.
- Borrowed a friends table saw for the fine cuts. My friends have all kinds of tools…just not biscuit joiners!
- Purchased a manual miter box kit instead of power saw. This thing is a beast to use though, especially on hardwood molding.
- Doing my own sanding with regular sand paper, instead of buying a sander.
Now that I have the right tools, I suspect I will be ready for stain in two to three more weeks.
Part 3 – A Review of the Entire Project Including Costs
If I can do it, you can! This is my final post about the desk project. But since it’s been a while, I’ll try and sum the whole project up here.
Why Build Your Own Desk?
The best reasons to tackle this project for me were:
- Not blowing my money on an expensive desk – I understand that $2,000 can buy you a nice heirloom. But I don’t need to buy one because my parents plan to give me theirs one day. A desk to me is strictly for utility. It just has to look half-way decent and fit my needs. When I started this project we were saving for the down payment on our house, so we needed all the extra cash we could get.
- Getting the exact desk I wanted – By making it myself, I could tweak the plans for my height (I like leg room), make it as big or little as I needed, and paint it whatever color I wanted.
- Getting up from the TV and doing something new – I really liked getting out in the garage on the weekends and working on this desk. It freed me from my normal routine and got me moving. I’ll admit though, at times it felt like I’d never finish it, but it’s so rewarding to build something from scratch like this.
The Plans for the Desk
I found these FREE plans on Popular Mechanics after a pretty simple Google image search for “desk plans” and “home office desk plans”. I wasn’t about to pay money for plans when most can be found for free on the Internet.
Tools I Needed to Build the Desk
I started out trying to make this desk on the super cheap. My plan was to use Lowes for all the rough cuts of the lumber (which they do for free), my friend’s table saw for the detailed cuts, a cheap miter box for the angled trim cuts, and hand sand the whole project.
While I was able to do those things for a while, there came a point when I needed to step up to some real tools to get the project done right. For one, the plans call for a biscuit joiner.
I also stepped up to my own table saw, power drill, and power sander, all of which I’ve used for other projects since. Here’s a list of the tools I ended up using on the project (with cost, if purchased).
- 2 Strap Clamps (for holding the boxes together once joined and glued) $28.06
- Miter Box (used until I bought the table saw) $13.51
- Biscuit Joiner $97.41
- Table Saw $113.50
- Power Drill $29.99
- Power Sander $29.99
- Hammer (for trim nails)
- Iron (for the veneer tape)
That’s about $140.00 total for tools I had to have just for this project, and another $175.00 for tools that I can use again. One note: I did not purchase the router to make my own top edging like the plans suggest. I just bought the pre-cut edging, which worked fine.

Cost of the Materials (based on receipts)
Top and Cabinets
- 1st Batch of Plywood (Birch) and Trim (Pre-Finished Pine Cove) $105.25
- 2nd Batch of Plywood (Birch), Trim (Pre-Cut Poplar), and Wood Glue $69.51
- Bicuits $7.50
- Base Trim (Pine) $32.00
Drawers and Hardware
- Plywood (Pine) $40.00
- Drawer Sliders $62.30
- Hanging File Frames $9.55
- Bronze Pulls $25.65
Paint and Primer (birch needs several coats) $35.00 (approx.)
Nails and Screws $10.00
That’s roughly $400.00 total in materials. You could do it cheaper by using lower grade plywood (I used the best that Lowe’s offered) and cheaper sliders (again, I went big here).
Modifications to the Plans
I thought it’d be worth noting that I decided to go without a few things for the desk. I didn’t install the pencil drawer. I’ve found that I don’t use those and I always hit them with my knees. Also, I didn’t finish the privacy back to the deskbecause:
- I wanted to be able to keep the desk in three pieces for easy moving, and
- I was going to use it against a wall (no privacy needed).
Although, you’ll see in the pic above that I do have a piece of unpainted plywood there, which is just to hide the wires.

Final Thoughts on the Finished Project
I spent roughly $700.00 (of which $175.00 is for tools that I now use all the time) on the desk. And I’d estimate that it took about 80 hours to complete, with Mrs. PT throwing in another 10-15 of her own helping paint.
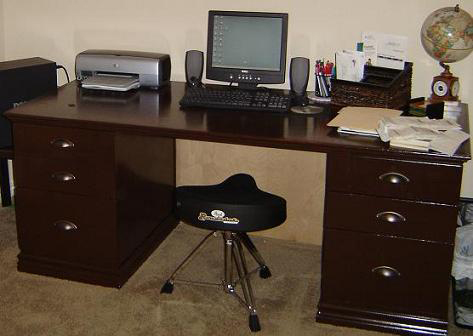
While it was a tough build and took a while (4 Months on/off), I’m super proud of this desk. I use it everyday and I’m so glad it turned out decent. It has everything I like in a desk (sturdy build, leg room, lots of space on top, and deep file cabinets). Who knows, it may end up being our own heirloom.
Update: Reader Mark just finished his desk and sent a picture. He said, “I started January of this year and after 9 months and a new baby I finally completed the desk.”

Well, congrats on both fronts, Mark! The desk looks great!
If you take on this project, please let me know.


Assuming I work 24 hours a day, yes, you *could* project that the “opportunity costs” and material costs would total to that much.
But I built this desk in my spare time, and as I explained in the post, I would have been sitting in front of my TV had I not built this desk. Last I checked sitting in front of my TV doesn’t make me money. 😉
Again, like I said in the post, there are many reasons to build your own desk and although one of the main reasons I cited for building the post was to save money, I admitted (again, in the post) that I didn’t save much, if any.
But I get the satisfaction of knowing I made something pretty cool. This also allowed me to write this post and share my project with everyone. This post is visited by several hundred people a month just like you who all are interested in building their own desk. This traffic is converted into about $18 in adsense revenue each month, or around $200 a year. Since this post is at least 3 years old I figure I’ve just about broke even on this project, not including labor. 😉
If you make $10-$20 an hour, didn’t this project actually cost you about $1650-$2600?
If you make $10-$20 an hour, didn’t this project actually cost you about $1650-$2600?
That looks awesome.
While I’m not sure I could ever make something that nice, I have hopes that I manage to make my own book shelf this winter…I’m hoping to borrow tools from brothers, though.
@Al – I painted b/c it was birch and I’ve heard birch doesn’t take to stain as well. I didn’t really research it too much but I heard there might be pre-treatment involved and I passed on the staining. Good luck if you decide to do it.
Any reason you painted instead of staining?
Thanks for you comment, Chris. Best of luck to you. Let me know if you have any questions.
Looks nice!
I need a new desk since I’m still using the conference table my FIL gave me. I had an estimate to have a custom solution for my office, including a nice closet setup. Cost was over $5000.
Looks like it’s time to hone up on my wood working skills.
Thanks, Mike.
Wow, that is a beautiful desk. I don’t think I have a place for all those tools in my apartment but making your own desk is a really neat idea. I bet it was fun.
I seem to remember it being an office supply store, like Staple. Here’s a link.
where did you buy the Hanging File Frames?
I definitely could have done it cheaper. You can find nice used desks for less than $500 I suppose. Then, like you say, I wouldn’t have been able to enjoy the project (experience). So you could say I paid for the experience.
Don’t know about you but when I want something my first inclination is to deny myself. Then, after some time, if I still want it, I turn to the internet (or other resource) for a cheaper way to either make it or buy it.
Wow! That looks pretty good. MY only question is whether you could have done it cheaper by simply spending the money on a sale in a furniture store?
I once build a 20W stereo amp (19″ rack and all) and that cost me as much as it would have if I had bought a new one except that the store bought one would not come with the pride of DIY.